|
As of V3, SliQ Submitter Plus includes a scheduler. The
scheduler makes it very easy to perform directory submission. By
running a submission in the scheduler SliQ will automatically cycle
through the following actions:-
1. Submission
2. Email Confirmation
3. Gathering Live Links
Every time you create a new campaign file in SliQ, the file will
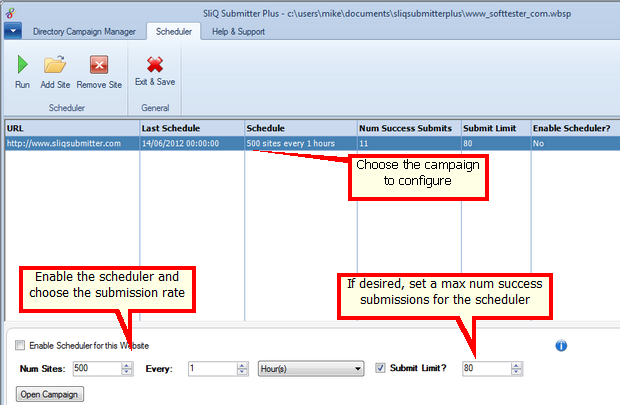
be included in the scheduler list. All you need to do then is
enable the scheduler for the campaign and choose the scheduler
rate.
Note that you can add and remove campaign files from the list
using the Add Site and
Remove Site buttons in the
toolbar.
To run the Scheduler, press the Run button in the toolbar.
SliQ will then start to
perform the scheduled operations. You can minimize SliQ and carry
on using your PC for other tasks.
Note that the maximum
number of successful submissions limit is only obeyed by the
Scheduler. If you run the Auto Submitter, Fast Submitter or Browser
Submitter from the Directory Campaign Manager tab, SliQ will ignore
the limit you have set on the Scheduler tab.
Also, even if the
scheduler has reached the total number of successful submissions
set in the limit, the scheduler will still continue to schedule
email confirmations and live link checks for the site until you
disable the scheduler for the site by unchecking the
Enable
Scheduler for this Website box on the Scheduler
tab.
See Also
|
